 LOGIWAKA
ご無沙汰しております、nicoです(。・ω・。)ノシ
共同開発メンバーからの提案で、プログラミングを使った3D制作に挑戦してみました。
・環境構築
・3D
・TypeScript
相変わらずのWindows11です。
package.json
{
  "name": "three-new",
  "private": true,
  "version": "0.0.0",
  "type": "module",
  "scripts": {
    "dev": "vite",
    "build": "tsc && vite build",
    "lint": "eslint src --ext ts,tsx --report-unused-disable-directives --max-warnings 0",
    "preview": "vite preview"
  },
  "dependencies": {
    "@react-three/fiber": "^8.13.4",
    "react": "^18.2.0",
    "react-dom": "^18.2.0",
    "three": "^0.154.0"
  },
  "devDependencies": {
    "@types/react": "^18.2.14",
    "@types/react-dom": "^18.2.6",
    "@types/three": "^0.153.0",
    "@typescript-eslint/eslint-plugin": "^5.61.0",
    "@typescript-eslint/parser": "^5.61.0",
    "@vitejs/plugin-react": "^4.0.1",
    "eslint": "^8.44.0",
    "eslint-plugin-react-hooks": "^4.6.0",
    "eslint-plugin-react-refresh": "^0.4.1",
    "typescript": "^5.0.2",
    "vite": "^4.4.0"
  }
}
tsconfig.json
{
  "compilerOptions": {
    "target": "ESNext",
    "useDefineForClassFields": true,
    "lib": ["ESNext", "DOM", "DOM.Iterable"],
    "module": "ESNext",
    "skipLibCheck": true,

    /* Bundler mode */
    "moduleResolution": "bundler",
    "allowImportingTsExtensions": true,
    "resolveJsonModule": true,
    "isolatedModules": true,
    "noEmit": true,
    "jsx": "react-jsx",

    /* Linting */
    "strict": true,
    "noUnusedLocals": true,
    "noUnusedParameters": true,
    "noFallthroughCasesInSwitch": true
  },
  "include": ["src","vite.config.ts"],
  "references": [{ "path": "./tsconfig.node.json" }]
}
tsconfig.node.json
{
  "compilerOptions": {
    "composite": true,
    "skipLibCheck": true,
    "module": "ESNext",
    "moduleResolution": "bundler",
    "allowSyntheticDefaultImports": true
  },
  "include": ["vite.config.ts"]
}
vite.config.ts
import { defineConfig } from 'vite'
import react from '@vitejs/plugin-react'

// https://vitejs.dev/config/
export default defineConfig({
  plugins: [react()],
})
index.html
<html lang="ja">
	<head>
		<meta charset="UTF-8">
		<title>three.js</title>
		<style>
			body { margin: 0; }
		</style>
	</head>
	<body>
		<div id="root"></div>
		<script type="module" src="/src/main.tsx"></script>
	</body>
</html>
main.tsx
import { StrictMode } from 'react';
import { createRoot } from 'react-dom/client';

import { App } from './App';

const root = createRoot(document.getElementById('root') as Element);

root.render(
  <StrictMode>
    <App />
  </StrictMode>
);
App.tsx
import './App.css';
import * as THREE from 'three'; //「* as」でライブラリのすべての機能やクラスにアクセスする
import { useEffect } from 'react'; //特定の要素を指定することでインポートや名前の衝突を回避する

export const App = () => {
  useEffect(() => { //非同期処理。フックの一つ。副作用(外部リソースへのアクセス・状態の変更・外部API呼び出し・DOM操作[Webページ内のHTML要素やその他のコンテンツをJavaScriptを使用して操作変更すること])を適切に管理する
    const canvas = document.getElementById("canvas") as HTMLCanvasElement; //HTMLの要素をJavaScriptコード内で取得
    const sizes = {
      width: window.innerWidth,
      height: window.innerHeight,
    };

    // Three.jsライブラリを使用して3Dシーンを作成
    const scene = new THREE.Scene();

    // 背景の画像読み込み
    const bgTexture = new THREE.TextureLoader().load("/models/ccc.png"); //THREE.TextureLoaderクラスを使用して、画像ファイルをテクスチャ[3Dオブジェクトの表面に貼り付ける画像やパターンのこと]として読み込み
    scene.background = bgTexture; //scene.backgroundプロパティを使用して背景を設定

    // 透視投影カメラ
    const camera = new THREE.PerspectiveCamera(55, sizes.width / sizes.height, 0.1, 1000); //透視投影カメラのコンストラクタ。(視野角, 描画領域, カメラから対象までの最小距離, カメラから対象までの最大距離)
    camera.position.set(0, 0, 3); //カメラ位置(X座標:左右方向, Y座標:上下方向, Z座標:前後方向)
    camera.lookAt(0, 0, 0); //カメラの視線を指定

    // WebGL[3Dを描画するための技術]レンダラー[3Dデータを画像のバッファに変換し、ディスプレイや画面上に表示する]
    const renderer = new THREE.WebGLRenderer({
      canvas: canvas, //レンダリング[3Dまたは2Dの情報を画像や動画として生成するプロセス]結果を描画
      antialias: true, //描画画像を滑らかにする
    });
    renderer.setSize(sizes.width, sizes.height); //レンダラーが表示する画面領域のサイズを設定
    renderer.setPixelRatio(window.devicePixelRatio); //ピクセル数の比率を設定することでクリアな描画を保つ
    renderer.setClearColor(0xd0f0d0); //レンダリング領域の背景色を設定。0xは16進数であることを示すプログラム

    // 人物画像の読み込み
    const texture = new THREE.TextureLoader().load('/models/hito.png');
    // 四角い物体に画像を貼り付け
    const boxTextureMaterial = new THREE.MeshStandardMaterial({
      map: texture,
    });

    // 人物(四角い物体)
    const boxWidth = 1;
    const boxHeight = 1;
    const boxDepth = 1;
    const boxGeometry = new THREE.BoxGeometry(boxWidth, boxHeight, boxDepth); //3Dジオメトリ(形状)を作成
    const boxMesh = new THREE.Mesh(boxGeometry, boxTextureMaterial); //Meshは頂点情報と面情報を使って物体を表現するためのデータ構造。3Dグラフィックスライブラリでは、メッシュを作成し、シーンに配置することで3Dオブジェクトを描画することができる。
    boxMesh.position.set(0, boxHeight / 2, 0); //シーン内で正確な位置に配置(中心座標を指定)
    scene.add(boxMesh); //シーン内に表示

    // 環境光
    const ambientLight = new THREE.AmbientLight(0xffffff, 0.5);
    scene.add(ambientLight);

    // ディレクショナルライト
    const directionalLight = new THREE.DirectionalLight(0xffffff, 1);
    directionalLight.position.set(3, 1, 2); // ライトの位置
    scene.add(directionalLight);

    // 丸い物体を作成
    const sphereRadius = 0.2;
    const sphereGeometry = new THREE.SphereGeometry(sphereRadius, 32, 32);
    const sphereMaterial = new THREE.MeshStandardMaterial({ color: 0xffffff });

    // 丸い物体1の位置調整
    const sphere1 = new THREE.Mesh(sphereGeometry, sphereMaterial);
    sphere1.position.set(1, 0, 1);
    scene.add(sphere1);

    // 丸い物体2の位置調整
    const sphere2 = new THREE.Mesh(sphereGeometry, sphereMaterial);
    sphere2.position.set(1, -1, 0);
    scene.add(sphere2);

    // 丸い物体3の位置調整
    const sphere3 = new THREE.Mesh(sphereGeometry, sphereMaterial);
    sphere3.position.set(1, 1, 0);
    scene.add(sphere3);

    // 長方形の物体を作成
    const rectangleWidth = 2;
    const rectangleHeight = 0.5;
    const rectangleDepth = 0.2;
    const rectangleGeometry = new THREE.BoxGeometry(rectangleWidth, rectangleHeight, rectangleDepth);
    const rectangleMaterial = new THREE.MeshStandardMaterial({ color: 0xE4E4E4 }); // 物体の色を設定

    // 長方形の物体の位置調整
    const rectangleMesh = new THREE.Mesh(rectangleGeometry, rectangleMaterial);
    rectangleMesh.position.set(-2, 1, 0); // 左斜め上に配置
    scene.add(rectangleMesh);

    // 四角い物体自体をクリックし、クリックした方向に移動させる
    function handleMouseClick(event: { clientX: number; clientY: number; }): void {
      const mouseX = (event.clientX / sizes.width) * 2 - 1;
      const mouseY = -(event.clientY / sizes.height) * 2 + 1;
      const raycaster = new THREE.Raycaster();
      const mousePosition = new THREE.Vector2(mouseX, mouseY);
      raycaster.setFromCamera(mousePosition, camera);
      const intersects = raycaster.intersectObject(boxMesh);
      if (intersects.length > 0) {
        const intersectionPoint = intersects[0].point;
        boxMesh.position.copy(intersectionPoint);
      }
    }

    // マウスクリックイベント
    window.addEventListener("click", handleMouseClick);

    // アニメーション
    const animate = () => {
      // 四角い物体を動かすアニメーションの処理
      const time = performance.now() * 0.001; // 現在の時間を取得(秒単位)
      const amplitude = 0.1; // 上下の振幅
      const frequency = 0.5; // 振動の速さ

      // 四角い物体のY座標を計算して設定
      const newY = Math.sin(time * frequency) * amplitude;
      boxMesh.position.setY(newY);

      // 描画のバッファをクリアし、アニメーションを滑らかに動作させる
      //renderer.clear();はコストがかかる
      renderer.render(scene, camera);

      // 次のアニメーションフレームを要求してアニメーションを続行
      requestAnimationFrame(animate);
    };
    animate();
  }, []);

  return (
    <>
      <canvas id="canvas"></canvas>
    </>
  );
};

export default App;
コメントがうるさくてすみません(。・ω・。)
そして今の状態がこちら。
最高にDASAI!!
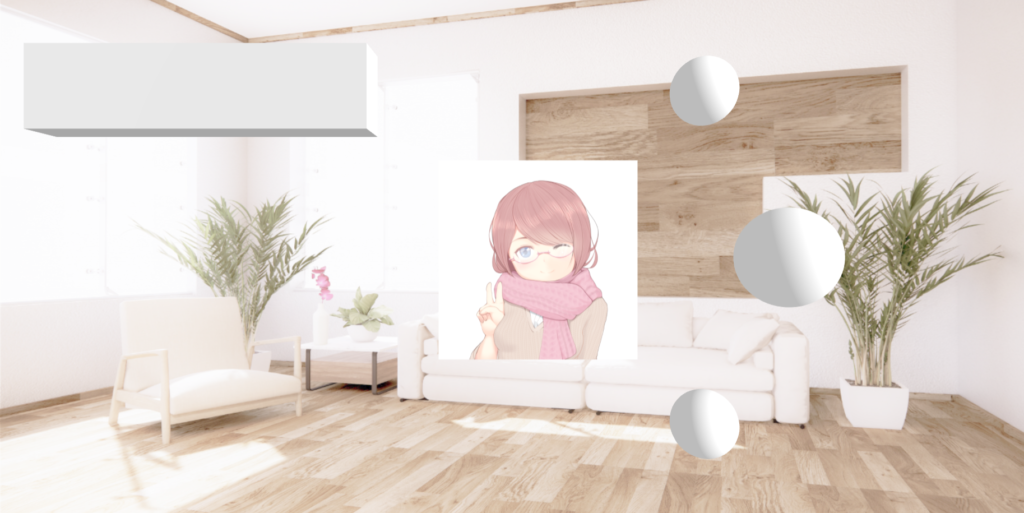
真ん中のお姉さんはCanvaで取得したフリー素材を使用しています。
実物ではふわふわと上下にお姉さんが動きます。
お姉さんをクリックすると、お姉さんが近づいてきます。

ちなみに、コミュニティメンバーから今回の作品につけられたあだ名は「エ○ゲ」でした。
ではでは(。・ω・。)ノシ